|
| SHOP | • | ARCHIVE | • | MKH NEWS | • | PFI | • | SHOPPERS' UPDATE | • | HOME |
| MY LIFE |
|
|
| MY SIMCHA |
|
|
| MY YEAR |
|
|
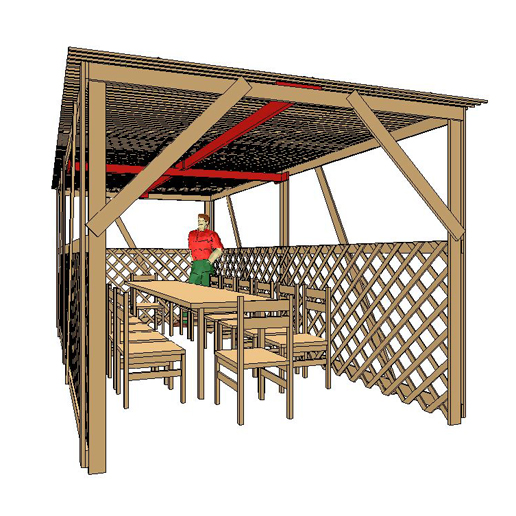
The E-ZEE-BILD Sukkah
(for a more diagrammatic presentation see EZsukkah)
You can build this 8' x 16' x 7' high
sukkah (seating 14) in 1 1/2 hours for less than $150 including
schach. Go to
Lowes or Home Depot and purchase the following materials: 36 - 8'x1x4,
3 -
8'x2x4, 4 - 2x4 joist hangers, 1 box of 1 1/4" exterior sheetrock
screws, and 2 rolls of 6' x 16' reed matting. Pay about $75 more
to buy
pressure-treated wood, which will last longer. The lattice panels
showns above will cost about $100, but any kind of wall material
including cloth or canvas will work. (See http://www.crcweb.org/SchachMatFencing2013.pdf for comprehensive halachic discussion of the suitability of "reed fencing" for schach.) . To put it all together you'll need a battery-powered
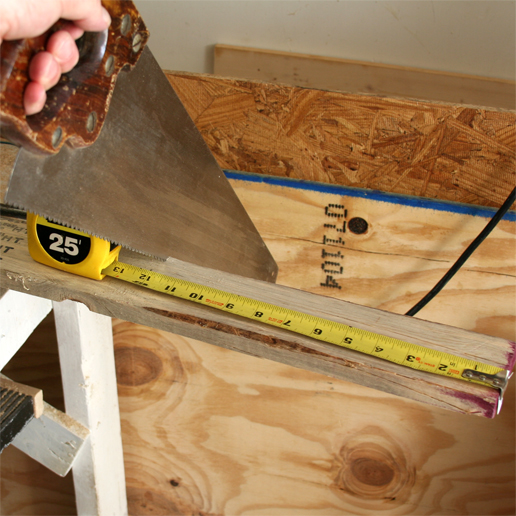
variable speed drill and any kind of
saw. Precision is not critical, but you should use a tape measure
for what little measuring is needed.
Start by laying out with chalk an 8'
x 7' square on your garage floor. Use adjacent walls or a curb and a wall for two sides
so you can lay out the pieces along a square and straight template.
Mark the 4' high point on the 7' sides. Take 12 1x4x8' and cut
off 1' to create 7' long uprights. This allows an uncut 1x4x8' to
be used as a diagonal brace. The lower height makes the sukkah feel more cozy and
is much easier to
assemble and decorate.
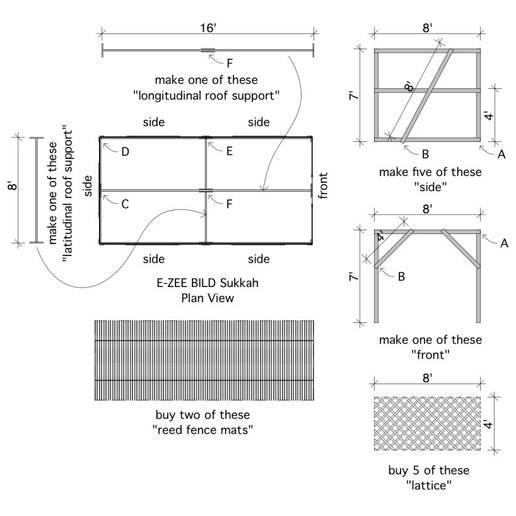
Now begin laying out a typical "side"
panel
of which there are 5...the "front" doorway is the only exception.
Lay
down 3 - 8' pieces starting at the base, at the 4' mark, and
at the top. Lay 2 7' uprights on either side, overlaying and
nicely lined up on each end of the 8-footers. If you use adjacent
walls, you'll be fairly sure each frame is square...which looks nicer
among other benefits. Lay 1 additional 8'
piece diagonally as shown in the picture so the two ends align with the
top and bottom 8-footers. Now place one screw at each
of six square junctions typically marked "A," and drive them in deep
because they're not coming out.
It may be a good idea to have
your young helper(s) hold things in place while you drive in the
screws. After screwing a panel together pick it up and move and
store it upright off to the side. Without the wall material it
will only weigh about 35 lbs. Try to be consistent in placing
the diagonal so the panels look neat. Place screws at the 3
diagonal junctions at the top, bottom, and 4' point typically marked
"B."

The doorway panel is constructed
without a base. Lay out 2 uprights, a top piece, and cutting 1 8'
piece in half 2 diagonal braces, and screw together.
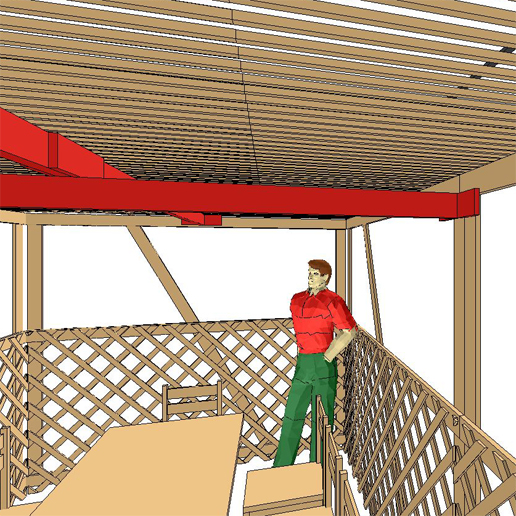
In the illustration below you see
Jack, our master of all trades, admiring the amateur construction
performed by a child of six. You can also see the assembly and
construction of the roof supports marked "E" at an end of the
latitudinal support on the right, "F" in the center of the longitudinal
support, and "C" at an end of the longitudinal support.
It's time to put it all
together. You will need the cutoffs, which we'll use as splice
blocks to attach the panels to each other, between adjacent panels and
to hold the longitudinal and latitudinal roof braces on top.
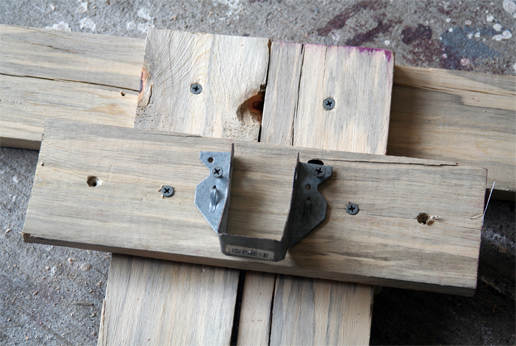
Take 4 cutoffs and partially screw joist hangers to the center of each,
taking care to align the bottom of the hanger with the bottom of the
piece of wood. Then take 2 and place at the midpoint of the top
horizontal member of the front (doorway) and back (short side) of the
sukkah marked C." Screw all screws securely to firmly attach the cutoff
with its mounted joist hanger to the top rail.
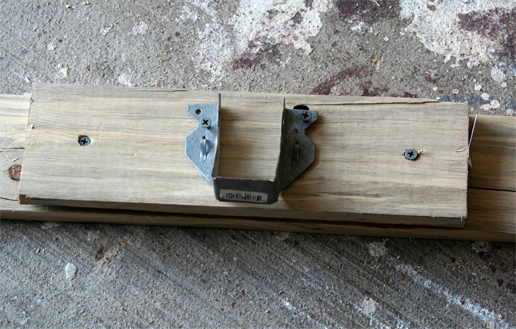
It should look like this when the 2 x 4 roof brace is later mounted in the joist hanger and is typically marked "C."
Now start assembling the panels
starting with the back or short side of the sukkah opposite the
doorway. You'll definitely need some extra hands for this unless
you're a proficient circus juggler. Stand up the back panel with
the horizontal members facing the inside of the sukkah, then stand up
an adjacent long-side panel with the horizontal members facing outside
the sukkah. Place a screw at the top, mid, and bottom points
through the long-side panel into the short-side panel nestled neatly
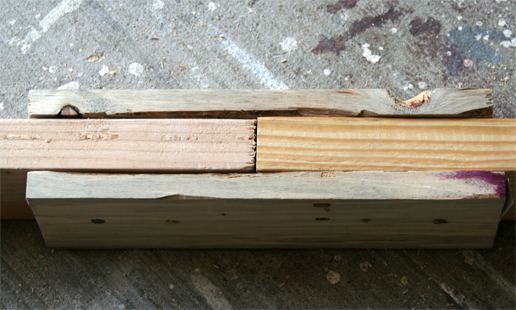
against it. The cutaway below shows the back or short-side panel
to the left and the long-side panel to the right...note how the
horizontal members are reversed, facing either inside or outside the
sukkah. This is typically marked "D."
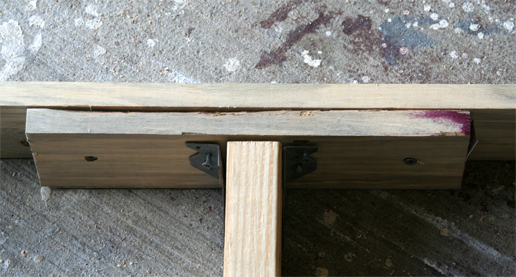
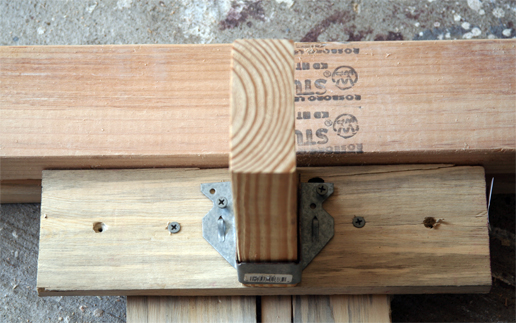
To attach the long-side panels to
each other we will use the other 2 cutoffs with joist hangers
attached. But, this time they will be mounted 3 1/2" below the
top of the top horizontal member so the top of the cutoff is aligned
with with bottom of the top horizontal members of the panels.
Note how the cutoff acts as a splice between the adjacent vertical
members. This is typically marked "E."
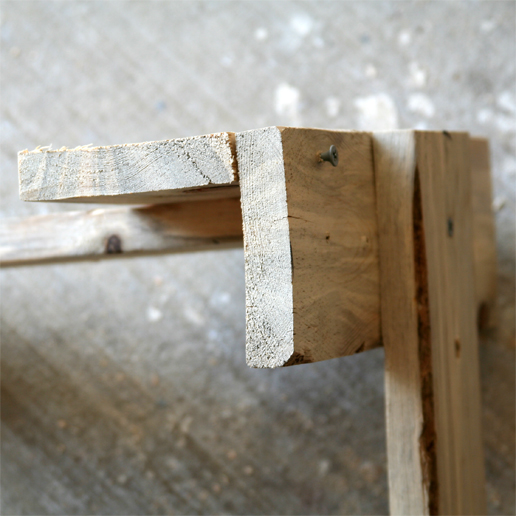
This will allow the longitudinal roof
brace to pass over and be supported by the shorter latitudinal brace
below, as is roughly shown in the mockup below. Use an additional
cutoff to slice the long-side panels at the bottom as well as the top.
Continue with the assembly of panels
until all four sides are complete and the whole is roughly rectangular,
not a parallelogram. Two sets of joist hangers should be opposite
each other...at the midpoints of both the short and long sides of the
sukkah. Take 1 8' 2x4 and if you've done everything right it
should fit as is between the joist hangers on the long sides. If
not, cut off a little until it does. Otherwise put one screw on
each side to secure the latitudinal roof brace in place. Inorder
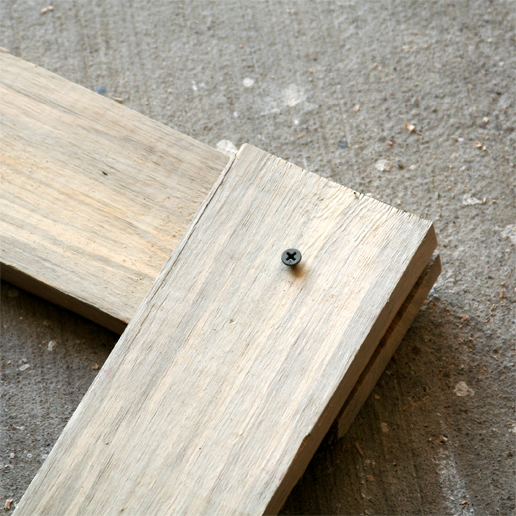
to assemble the longer roof brace we're going to scarf or splice two 8'
2x4's together. Take the remaining 8' 1x4 and cut in half.
Butt the ends of the 2x4's together as they lay on their sides.
Lay one of the 4' 1x4's on top and align so that 2' overlaps one 2x4
and 2' the other. Place at least 4 screws staggered on each side
of the splice, turn the whole assembly over and repeat on the other
side. Take care that you do not screw the screws through the 1x4
so tightly that you crack it. Your finished splice will look
something like this, although the splice blocks you'll use will be much
longer than what's shown here. This is typically marked "F."
Pick up and lift into place. If
too long, cut a little off so it fits snugly. Finish by putting
at least one screw through the joist hanger and into the brace on each
side. You'll almost finished. Roll out the reed matting
down the length of the sukkah, overlapping along the longitudinal
brace. If you use the HomeDepot matting, you must do it this way
because otherwise the wire binding material will constitute a maimid and posul your schach.
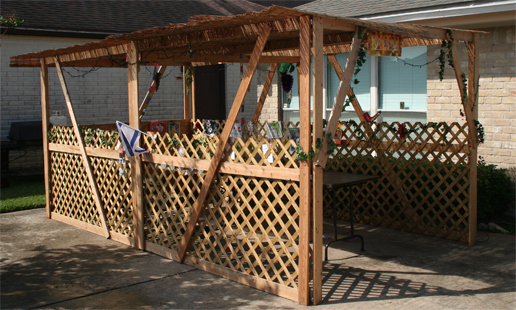
Finish the walls anyway you want. You only need to fill half the panel as the intermediate horizontal brace is set at ~48" or a bit more than the 10 tefachimheight required for kosher walls. We've shown 4 x 8 lattice panels because they can be attached without much modification and are easy to find. We prefer shade fabric in the south because it's often hot as it cuts the strength of the sun and keeps out bugs, but any kind of fabric or lattice will work. If it's cold where you are, use heavier fabric or even plastic. Never use plastic where it's hot or you'll cook!
To put away roll up the schach, take down the roof braces, remove the splice blocks on each of the long sides, then back out but don't remove the rest of the screws holding the sides together. Be sure someone else is helping so the sides don't clatter to the ground as they are loosened. If you have a blank side of your house or garage at least 20' long with an overhanging eave, you're in business. Get 4 long brackets (type used to store bicycles, etc.) and attach to the wall at least 7'-6" off the ground to hang 2 sets of panels. Hang 4 on one set and 4 on the other, draping the roof braces over both. Hang the schach rolls from the hooks. Don't bother to remove the wall material and it will be ready to go when you set up your sukkah next year. Get a plastic tarp (or just a roll of black plastic) long enough to cover everything, tuck and/or tack in the top and sides but the leave the bottom open for ventilation. It will last for many years as long as it's stored out of the sun and stays fairly dry.
Ordinarily we'd warn you to beware of cheap imitations, but this sukkah is so cheap no one will bother to imitate it.
| SUBMISSIONS | • | ADVERTISERS | • | TERMS OF USE | • | PRIVACY |
| ARTICLE ARCHIVE | • | NEWSLETTERS | • | KEYWORD SEARCH | • | HELP | • | HOME |